Creating remote Git repository with Git GUI
Getting started with Git versioning
by Iain Wilson

Okay, I accept Git remote repositories is rather geeky article subject and may have limited appeal to non web software development people.
But this is something we have to do only occasionally and can never remember how to do it, so the article works as an aide memoire for us, in addition to providing you with an enlightening subject.
For context, Git is a brilliant software versioning system. It allows you to keep a definitive production version of your software while at the same time branching off other versions to do development, that can be merged back into the main version if required. If you want to know lots about it, read the book.
There is heaps to Git, but the way we want to use it is to have the definitive version of the software on a backed up remote server, and have development version(s) of the software on development PCs. Whenever we have tested out some new functionality on a development version, we push it back to the central repository.
Now, Git has both a command line and a GUI interface. The command line can do everything, but the GUI can't. We frequently use a small set of commands that the GUI can satisfy, but the initial setting up of the central repository is more complicated and needs some command line instructions.
So for posterity, here is how we set it up.
We go through the following steps:
- Create your local version of the software in a local directory.
- Create a local git repository on the local directory.
- Create a ‘bare’ git repository in your remote directory location.
- Add the remote repository details to your local repository then push all the local files to your remote repository.
Here is how to do each step.
Step 1
You’ve already got a local directory if you’re needing to back it up to a remote repository. It will just be a directory that contains files and possibly subdirectories, all of which contain your application.
Step 2
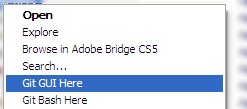
Using Windows Explorer, find the local directory containing your files, right click on it and choose Git GUI Here, then Create New Repository.
Enter the path of the local directory in the popup window, and click Create. This will create all the necessary files in your local directory for the local repository.
After you've done that, you may see all your files listed in the top left window 'Unstaged Changes'. If you do, you need to stage them by clicking on the Stage Changed button, then commit them with the Commit button (you will need to enter a commit message first).
Step 3

Now create the remote directory and give it a name that has a .git extension. Use Windows Explorer to go to the remote directory and right click it, then choose Git Bash Here.
This will bring up the Git command line. We are going to create the empty remote repository by using the command line (sorry, can't find any way to do this in the GUI). Type in:-
git --bare init
This command will create the empty remote repository, and then you're done with the command line!
Step 4

Now get back to Windows Explorer, right click on the local directory and choose Git GUI Here.
This will bring up the Git GUI for your local repository.
Choose Remote->Add.. then fill in the form as follows:
Name: Usually ‘origin’ but could be any arbitrary name for your remote repository
Location: The full path to the directory of your remote repository
Then check the ‘Initialize Remote Repository and Push’ radio button and click Add.
Result!
You will then have a development environment that will allow you create branches and clone versions of the remote repository, and have the ability to always keep the remote repository up to date as the definitive version of the software.
Liked this article? Please share it with your friends and colleagues.
